Installing cups-pdf
One of the cool things we can do is install the cups-pdf package which supports a virtual printer that creates PDF files in lieu of actual printed output. After installation, we will take advantage of the package to demonstrate how to configure CUPS. Using apt-get we can install the package this way:
sudo apt-get install cups-pdf
Configuring CUPS
CUPS, by default, makes available a web-based configuration system. To access it, we will use w3m:
w3m http://localhost:631
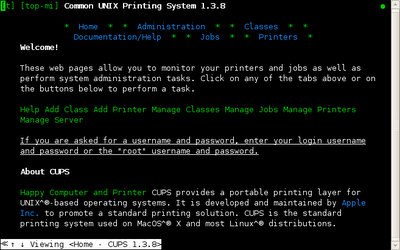
which will open the web page on the local network interface using port 631. After the page opens, we will get a screen like this:

With this interface, you can configure:
- Local USB, parallel port and virtual printers.
- Remote IPP (Internet Printing Protocol) printers. Cups will find them automatically if your network allows it.
- Remote SMB (Windows shared) printers.
- Using the tab key, move the cursor to the link labeled "Add Printer" and press enter.
- We will see a new page with some input fields. They are delimited with square bracket characters ([]). To enter data into the fields, move the cursor to the field and press enter. A text prompt will appear at the bottom of the screen.
- In the first field, "Name:" we will enter the name of the printer to be added. This name is like a file name and should be one word with no spaces. We will call our new printer, PDF. Type the letters PDF at the text prompt and press enter.
- Press the tab key to move to the next field, "Location:" and enter "localhost" using the text prompt.
- Press the tab key to move to the next field, "Description:" and enter "CUPS-PDF Virtual Printer."
- Press the tab key to move to the link labeled "Continue" and press enter. After a few seconds, we will see a new screen with a pull-down box of printer devices. Using the tab key move the cursor to the field labeled "Device:" and press enter. The contents of the list will appear.
- Using the arrow keys, select the entry "CUPS-PDF (Virtual PDF Printer)" and press enter.
- Press the tab key to move to the "Continue" link. Press enter.
- After a few seconds, a new screen will appear, again with a pull-down box. This box is for selecting drivers. The CUPS-PDF driver does not really need this, so open the box labeled "Make:" and select "Generic" and press enter.
- Move to the "Contiune" link and press enter.
- The next screen will appear and we can skip over the fields (they should already be correct.) Move the cursor to the link labeled "Add Printer" and press enter.
- You will briefly see a screen announcing that the printer has been successfully added. It will be followed by a page of printer options. If you need to change any, such as default paper size, do so now. When done, move to the link labeled "Set Printer Options" and press enter.
- The final screen contains a summary of the printer setup and contains a list of links for controlling the printer including printing a test page.
At this point we are done. You may move to the "Home" link at the top of the page to repeat the process to add more printers.
That's all for this installment. Next time we will look at some printer commands that we can use with our new printing capability.
Further Reading
Other installments in this series: 1 2 3 4 5 6 7 8 9 10 11 12 13 14


No comments:
Post a Comment