Now that we have installed a bunch of interactive applications on our workstations and SSH to allow remote access, we have a slight problem. Is it reasonable for an interactive program (like mutt) monopolize our terminal session? Isn't Linux multi-tasking? On the graphical desktop, we can have many applications running at once and, by moving the mouse, we can switch from application to application. Of course, on the console, we can switch virtual terminals to provide multiple sessions and if we are using SSH, remotely accessing our workstation from a graphical desktop, we can open multiple terminal windows.
But there's another way. The screen program allows multiple sessions inside a single terminal. You can create any number of sessions and can even split screens to view two sessions at once. Further (and this is the cool part), screen allows you to "detach" a session from a terminal and later re-attach the session to a different terminal.
Installing And Running screen
By this time, we all know the drill:
me@linuxbox:~$ sudo apt-get install screen
will install the screen package. To run screen, we type screen at the prompt followed optionally by the name of a program we want to execute in the screen session. If no program is specified, screen launches a shell. Try this:
me@linuxbox:~$ screen top
After you run this command, top will execute and everything will appear normal. However screen is now managing the terminal session. screen recognizes a large number of commands. You communicate with screen by pressing Ctrl-a followed by a command letter. For example, to create another session type Ctrl-a c and a new shell prompt will appear. There are now two sessions running in the same terminal. We can cycle through the sessions by repeatedly typing Ctrl-a n (for next).
Listing Your Sessions
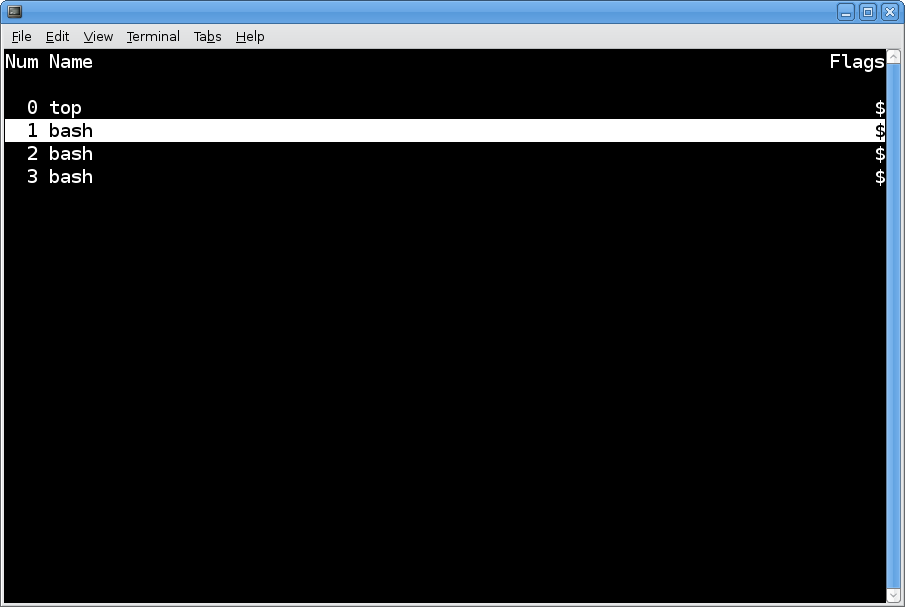
The Ctrl-a " command displays a list of your screen sessions:
Scrolling And Copying
If you are using screen on a terminal session displayed in a graphical terminal, you will notice that the normal scrolling mechanism no longer works. This makes sense because if it did, your graphical terminal's scroll back buffer would contain the jumbled contents of all of the screen terminal sessions. screen manages its own scroll back buffers, one for each screen session. To access the scroll back buffer (which is called "copy mode" in the screen documentation), type: Ctrl-a [ and you will be able to use up arrow, PgUp, etc to navigate the buffer. In this mode (which uses many of the vi keyboard sequences) you can copy text for later pasting. You do this by marking text. To mark text, you position the cursor at the beginning of the text you want to copy and press the space bar, then move the cursor to the end of the text you want to copy and press the space bar again. The marked region is copied into a paste buffer and screen exits copy mode. To paste the copied text, type the screen command: Ctrl-a ]
Detaching And Reattaching Sessions
By far, the coolest feature of screen is its ability to detach and reattach terminal sessions. Picture this scenario: you're at work and you have just started a long running job on your work computer in a terminal. With screen, you can detach the session, log off, go home, reconnect with the your work computer, then reattach the still-running job to your new terminal session.
Here is a demonstration (assuming we have another computer besides our workstation, if not, you can use two virtual terminals on the workstation):
- Start screen on the workstation and create a few sessions and put applications in them. Try top, mutt, and irssi, for example.
- After the applications are running, move over to your second computer and log into the workstation using SSH.
- On the second computer, enter the command screen -D -R into the remote SSH session.
- Poof! All the screen sessions on the workstation are detached, you are logged off of the workstation console, and all of the sessions are reattached to the terminal running the SSH client on the second computer. Pretty slick!
We've only touched on the capabilities of screen. It has many commands and a configuration file that can be used to adjust many of its features. See the links below for more detail.
In Conclusion
I hope you have enjoyed this series and that you continue to learn about the applications and techniques that we have covered. While we created a workstation that did not have a windowing system, the programs we installed work just fine on graphical workstations too. The text-based capabilities of Linux should never be overlooked. Text-based applications are almost always faster and much less resource-intensive than their graphical counterparts, so they make great additions to you solutions toolbox.
Further Reading
The official GNU screen site and documentation:
A screen tutorial from the Debian project:
A quick reference guide to screen (this site also contains a lot of other well-written screen documentation):
Other installments in this series: 1 2 3 4 5 6 7 8 9 10 11 12 13 14


All-Text Linux Workstation
ReplyDeleteQuestion:
- on xterm or
- on a simple tty?
If X is needed, the title is'nt correct.
If you are talking about the fact that I make my screen shots for the series on an X display, I discuss that in part 13. The machine actually running the applications does not have X installed.
ReplyDeleteIs this the last in the series?
ReplyDeleteNice topic!! I would like to add some others programs:
ReplyDeleteltp: ftp client
wget: good web downloader
moc: nice music player
rtorrent: bittorrent client
mplayer + framebuffer: movie player, but needs the framebuffer