Friday, April 3, 2009


Tip: Redirecting Multiple Command Outputs
Let's imagine a simple script:
Make A Separate Script
script1:
Write A Shell Function
We could take the basic idea of the separate script and incorporate it into a single script by making script1 into a shell function:
Make A List
We could construct a compound command using {} characters to enclose a list of commands:
Launch A Subshell
Finally, we could do this:
Enjoy!
#!/bin/bashSimple enough. It produces three lines of output:
echo 1
echo 2
echo 3
1Now let's say we wanted to redirect the output of the commands to a file named foo.txt. We could change the script as follows:
2
3
#!/bin/bashAgain, pretty straightforward, but what if we wanted to pipe the output of all three echo commands into less? We would soon discover that this won't work:
F=foo.txt
echo 1 >> $F
echo 2 >> $F
echo 3 >> $F
#!/bin/bashThis causes less to be executed three times. Not what we want. We want a single instance of less to input the results of all three echo commands. There are four approaches to this:
F=foo.txt
echo 1 | less
echo 2 | less
echo 3 | less
Make A Separate Script
script1:
#!/bin/bashscript2:
echo 1
echo 2
echo 3
#!/bin/bashBy running script2, script1 is also executed and its output is piped into less. This works but it's a little clumsy.
script1 | less
Write A Shell Function
We could take the basic idea of the separate script and incorporate it into a single script by making script1 into a shell function:
#!/bin/bashThis works too, but it's not the simplest way to do it.
# shell function
run_echoes () {
echo 1
echo 2
echo 3
}
# call shell function and redirect
run_echoes | less
Make A List
We could construct a compound command using {} characters to enclose a list of commands:
#!/bin/bashThe {} characters allow us to group the three commands into a single output stream. Note that the spaces between the {} and the commands, as well as the trailing semicolon after the third echo, are required.
{ echo 1; echo 2; echo 3; } | less
Launch A Subshell
Finally, we could do this:
#!/bin/bashPlacing the list inside () creates a subshell, or another copy of bash and it executes the commands. This has the same result as enclosing the list of commands within {} but with more overhead. The real reason we would want to do this is if, instead of just redirecting the output, we wanted to put all three commands in the background:
(echo 1; echo 2; echo 3) | less
#!/bin/bashThis doesn't make much sense for our echo commands (they execute too quickly to bother with), but if we have commands that take a long time to run, this technique can come in handy.
(echo 1; echo 2; echo 3) > foo.txt &
Enjoy!
Friday, March 27, 2009
Project: Building An All-Text Linux Workstation - Part 6
In this installment, we will tackle printing. If you recall from the second installment when we installed Debian on the system, we selected the "print server" group of packages to included with our installation. This installed CUPS (Common Unix Printing System) and related programs. This set of packages allows the system to print local print jobs and (if configured to do so) act as a print server to other systems on the local network.
Installing cups-pdf
One of the cool things we can do is install the cups-pdf package which supports a virtual printer that creates PDF files in lieu of actual printed output. After installation, we will take advantage of the package to demonstrate how to configure CUPS. Using apt-get we can install the package this way:
sudo apt-get install cups-pdf
Configuring CUPS
CUPS, by default, makes available a web-based configuration system. To access it, we will use w3m:
w3m http://localhost:631
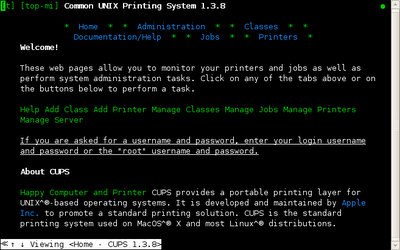
which will open the web page on the local network interface using port 631. After the page opens, we will get a screen like this:
With this interface, you can configure:
At this point we are done. You may move to the "Home" link at the top of the page to repeat the process to add more printers.
That's all for this installment. Next time we will look at some printer commands that we can use with our new printing capability.
Further Reading
Other installments in this series: 1 2 3 4 5 6 7 8 9 10 11 12 13 14
Installing cups-pdf
One of the cool things we can do is install the cups-pdf package which supports a virtual printer that creates PDF files in lieu of actual printed output. After installation, we will take advantage of the package to demonstrate how to configure CUPS. Using apt-get we can install the package this way:
sudo apt-get install cups-pdf
Configuring CUPS
CUPS, by default, makes available a web-based configuration system. To access it, we will use w3m:
w3m http://localhost:631
which will open the web page on the local network interface using port 631. After the page opens, we will get a screen like this:

With this interface, you can configure:
- Local USB, parallel port and virtual printers.
- Remote IPP (Internet Printing Protocol) printers. Cups will find them automatically if your network allows it.
- Remote SMB (Windows shared) printers.
- Using the tab key, move the cursor to the link labeled "Add Printer" and press enter.
- We will see a new page with some input fields. They are delimited with square bracket characters ([]). To enter data into the fields, move the cursor to the field and press enter. A text prompt will appear at the bottom of the screen.
- In the first field, "Name:" we will enter the name of the printer to be added. This name is like a file name and should be one word with no spaces. We will call our new printer, PDF. Type the letters PDF at the text prompt and press enter.
- Press the tab key to move to the next field, "Location:" and enter "localhost" using the text prompt.
- Press the tab key to move to the next field, "Description:" and enter "CUPS-PDF Virtual Printer."
- Press the tab key to move to the link labeled "Continue" and press enter. After a few seconds, we will see a new screen with a pull-down box of printer devices. Using the tab key move the cursor to the field labeled "Device:" and press enter. The contents of the list will appear.
- Using the arrow keys, select the entry "CUPS-PDF (Virtual PDF Printer)" and press enter.
- Press the tab key to move to the "Continue" link. Press enter.
- After a few seconds, a new screen will appear, again with a pull-down box. This box is for selecting drivers. The CUPS-PDF driver does not really need this, so open the box labeled "Make:" and select "Generic" and press enter.
- Move to the "Contiune" link and press enter.
- The next screen will appear and we can skip over the fields (they should already be correct.) Move the cursor to the link labeled "Add Printer" and press enter.
- You will briefly see a screen announcing that the printer has been successfully added. It will be followed by a page of printer options. If you need to change any, such as default paper size, do so now. When done, move to the link labeled "Set Printer Options" and press enter.
- The final screen contains a summary of the printer setup and contains a list of links for controlling the printer including printing a test page.
At this point we are done. You may move to the "Home" link at the top of the page to repeat the process to add more printers.
That's all for this installment. Next time we will look at some printer commands that we can use with our new printing capability.
Further Reading
Other installments in this series: 1 2 3 4 5 6 7 8 9 10 11 12 13 14
Monday, March 23, 2009
Saturday, March 21, 2009
Project: Building An All-Text Linux Workstation - Part 5
In today's episode, we'll look at sudo and some text editing stuff. So fire up your text boxes and let's get going!
sudo
If you're an Ubuntu user, you probably already know a little about sudo. It's the command you use to get temporary administrative privileges for doing such things as editing configuration files and installing software. sudo allows users to enter their own password instead of the root password to perform privileged tasks. Further, sudo can be configured to allow specific users specific privileges. For example, a user can be allowed to only execute a specific command as the superuser.
sudo is invoked this way:
sudo command
where command is the command to be executed with escalated privileges.
One of the inconveniences on our all-text system is that we must either login as root or use the su command to shut the system down, since only the superuser is allowed to shutdown the system. A sensible precaution considering that Linux systems are designed to support multiple users at the same time.
To fix this problem, we'll install sudo on our system. We can do this with either aptitude or apt-get. As root, enter the following command:
apt-get install sudo
and the sudo package will be installed.
sudo is controlled by a configuration file named /etc/sudoers. The sudoers file is a little unique in that it wants to be edited only with the visudo program. You can actually edit it with any text editor, but the visudo program checks the syntax of the file to help prevent errors. This is important for any file with the security implications of sudoers.
To edit the file, we simply (as root again) enter the command:
visudo
and the following screen will appear:

Despite the name, the visudo program uses the nano text editor and not vi. This makes it much easier for new users. Our change to the sudoers file is very simple. Add this line in the section labled "User privilege specification" and then save the file and exit the editor by first typing ctrl-o and then ctrl-x.:
me ALL=(ALL) ALL
Substitute your user name for the name "me" and this configuration will allow you to execute any command with root privileges by entering your own password.
To allow a user of the system to only run the poweroff command (performs the same as shutdown but does not require the time to be specified), we could add this line to the file:
username ALL=(ALL) /sbin/poweroff
where username is the name of the user.
nano
As we have seen, our Debian system has the nano text editor installed by default. nano is a clone of an earlier editor named pico that is included with the pine email program. pine has some license issues that prevents it from being included with some Linux distributions so a replacement version of its editor was developed.
To use nano, type the following:
nano textfile
where textfile is the name of a file to edit.
As text-based editors go, it's pretty easy to use. It provides a small list of commands at the bottom of the screen. Pressing the ctrl-g key brings up the help screen which displays all of its commands. nano does support the mouse. See the nano man page for details.
nano uses a global configuration file named /etc/nanorc and, if available, a local configuration file named ~/.nanorc. To make an initial copy of the local configuration file, copy the global file to your home directory:
me@linuxbox:~$ cp /etc/nanorc ~/.nanorc
One useful change we can make to the configuration file is the activation of syntax highlighting. This can be done by removing comments from several lines at the end of the file. The last section of the configuration file, the "Color setup" section, has a number of "include" statements which load syntax definitions. To enable syntax highlighting support, remove the comment symbol from the beginning of the line. Change lines like this:
## Bourne shell scripts
#include "/usr/share/nano/sh.nanorc"
to:
## Bourne shell scripts
include "/usr/share/nano/sh.nanorc"
for as many languages as you wish to support.
Syntax highlighting is automatically activated based on the file name extension of the file being edited. For example, if we edit a file named foo.html and the HTML syntax definition has been included in the .nanorc file, the foo.html file will be displayed with syntax highlighting when loaded. The colors can be toggled on and off by pressing alt-y. This presents a problem for shell scripts, however as most do not have a file extension in their name. This can be solved in one of two ways. First, add the extension ".sh" to the file name, or second, invoke nano with the -Y sh option, which forces the selection of the sh highlighting. It might be a good idea to add an alias such as:
alias nano-sh='nano -Y sh'
to your .bashrc file to make this more convenient.
vim
Real Linux users, of course, don't use nano. They use vim, the enhanced replacement for the traditional Unix editor, vi. The version of vim installed by default on our system is called vim-tiny, a subset of the full package. I recommend installing the full vim package. This can be done with apt-get like so:
apt-get install vim
I'm not going to cover vim in this posting as it would take too much space (it consumed a rather chapter in my upcoming book) but there is a pretty good on-line book (in PDF format) that describes it in detail. See The Vim Book. Seriously, to be a real Linux person you should take the time to learn it. I know its not easy, but you'll really enjoy lording it over the other Linux newbies once you do.
Well, that's all for this time. See you again soon!
Further Reading
Other installments in this series: 1 2 3 4 5 6 7 8 9 10 11 12 13 14
sudo
If you're an Ubuntu user, you probably already know a little about sudo. It's the command you use to get temporary administrative privileges for doing such things as editing configuration files and installing software. sudo allows users to enter their own password instead of the root password to perform privileged tasks. Further, sudo can be configured to allow specific users specific privileges. For example, a user can be allowed to only execute a specific command as the superuser.
sudo is invoked this way:
sudo command
where command is the command to be executed with escalated privileges.
One of the inconveniences on our all-text system is that we must either login as root or use the su command to shut the system down, since only the superuser is allowed to shutdown the system. A sensible precaution considering that Linux systems are designed to support multiple users at the same time.
To fix this problem, we'll install sudo on our system. We can do this with either aptitude or apt-get. As root, enter the following command:
apt-get install sudo
and the sudo package will be installed.
sudo is controlled by a configuration file named /etc/sudoers. The sudoers file is a little unique in that it wants to be edited only with the visudo program. You can actually edit it with any text editor, but the visudo program checks the syntax of the file to help prevent errors. This is important for any file with the security implications of sudoers.
To edit the file, we simply (as root again) enter the command:
visudo
and the following screen will appear:

Despite the name, the visudo program uses the nano text editor and not vi. This makes it much easier for new users. Our change to the sudoers file is very simple. Add this line in the section labled "User privilege specification" and then save the file and exit the editor by first typing ctrl-o and then ctrl-x.:
me ALL=(ALL) ALL
Substitute your user name for the name "me" and this configuration will allow you to execute any command with root privileges by entering your own password.
To allow a user of the system to only run the poweroff command (performs the same as shutdown but does not require the time to be specified), we could add this line to the file:
username ALL=(ALL) /sbin/poweroff
where username is the name of the user.
nano
As we have seen, our Debian system has the nano text editor installed by default. nano is a clone of an earlier editor named pico that is included with the pine email program. pine has some license issues that prevents it from being included with some Linux distributions so a replacement version of its editor was developed.
To use nano, type the following:
nano textfile
where textfile is the name of a file to edit.
As text-based editors go, it's pretty easy to use. It provides a small list of commands at the bottom of the screen. Pressing the ctrl-g key brings up the help screen which displays all of its commands. nano does support the mouse. See the nano man page for details.
nano uses a global configuration file named /etc/nanorc and, if available, a local configuration file named ~/.nanorc. To make an initial copy of the local configuration file, copy the global file to your home directory:
me@linuxbox:~$ cp /etc/nanorc ~/.nanorc
One useful change we can make to the configuration file is the activation of syntax highlighting. This can be done by removing comments from several lines at the end of the file. The last section of the configuration file, the "Color setup" section, has a number of "include" statements which load syntax definitions. To enable syntax highlighting support, remove the comment symbol from the beginning of the line. Change lines like this:
## Bourne shell scripts
#include "/usr/share/nano/sh.nanorc"
to:
## Bourne shell scripts
include "/usr/share/nano/sh.nanorc"
for as many languages as you wish to support.
Syntax highlighting is automatically activated based on the file name extension of the file being edited. For example, if we edit a file named foo.html and the HTML syntax definition has been included in the .nanorc file, the foo.html file will be displayed with syntax highlighting when loaded. The colors can be toggled on and off by pressing alt-y. This presents a problem for shell scripts, however as most do not have a file extension in their name. This can be solved in one of two ways. First, add the extension ".sh" to the file name, or second, invoke nano with the -Y sh option, which forces the selection of the sh highlighting. It might be a good idea to add an alias such as:
alias nano-sh='nano -Y sh'
to your .bashrc file to make this more convenient.
vim
Real Linux users, of course, don't use nano. They use vim, the enhanced replacement for the traditional Unix editor, vi. The version of vim installed by default on our system is called vim-tiny, a subset of the full package. I recommend installing the full vim package. This can be done with apt-get like so:
apt-get install vim
I'm not going to cover vim in this posting as it would take too much space (it consumed a rather chapter in my upcoming book) but there is a pretty good on-line book (in PDF format) that describes it in detail. See The Vim Book. Seriously, to be a real Linux person you should take the time to learn it. I know its not easy, but you'll really enjoy lording it over the other Linux newbies once you do.
Well, that's all for this time. See you again soon!
Further Reading
Other installments in this series: 1 2 3 4 5 6 7 8 9 10 11 12 13 14
Subscribe to:
Posts (Atom)


 Posts
Posts

