Friday, March 27, 2009

Project: Building An All-Text Linux Workstation - Part 6

In this installment, we will tackle printing. If you recall from the second installment when we installed Debian on the system, we selected the "print server" group of packages to included with our installation. This installed CUPS (Common Unix Printing System) and related programs. This set of packages allows the system to print local print jobs and (if configured to do so) act as a print server to other systems on the local network.

Installing cups-pdf

One of the cool things we can do is install the cups-pdf package which supports a virtual printer that creates PDF files in lieu of actual printed output. After installation, we will take advantage of the package to demonstrate how to configure CUPS. Using apt-get we can install the package this way:

sudo apt-get install cups-pdf

Configuring CUPS

CUPS, by default, makes available a web-based configuration system. To access it, we will use w3m:

w3m http://localhost:631

which will open the web page on the local network interface using port 631. After the page opens, we will get a screen like this:
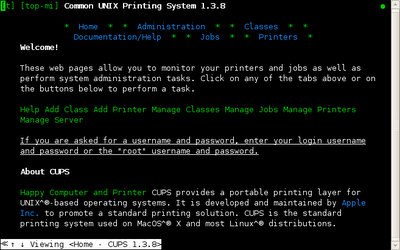


With this interface, you can configure:
  • Local USB, parallel port and virtual printers.
  • Remote IPP (Internet Printing Protocol) printers. Cups will find them automatically if your network allows it.
  • Remote SMB (Windows shared) printers.
To add the PDF virtual printer, follow this procedure. Note that at some point you may be prompted to enter a user name and password for CUPS. Regular users are not allowed to make system-wide changes to the printing system. When prompted enter the user name "root" and the root password to continue.

  1. Using the tab key, move the cursor to the link labeled "Add Printer" and press enter.
  2. We will see a new page with some input fields. They are delimited with square bracket characters ([]). To enter data into the fields, move the cursor to the field and press enter. A text prompt will appear at the bottom of the screen.
  3. In the first field, "Name:" we will enter the name of the printer to be added. This name is like a file name and should be one word with no spaces. We will call our new printer, PDF. Type the letters PDF at the text prompt and press enter.
  4. Press the tab key to move to the next field, "Location:" and enter "localhost" using the text prompt.
  5. Press the tab key to move to the next field, "Description:" and enter "CUPS-PDF Virtual Printer."
  6. Press the tab key to move to the link labeled "Continue" and press enter. After a few seconds, we will see a new screen with a pull-down box of printer devices. Using the tab key move the cursor to the field labeled "Device:" and press enter. The contents of the list will appear.
  7. Using the arrow keys, select the entry "CUPS-PDF (Virtual PDF Printer)" and press enter.
  8. Press the tab key to move to the "Continue" link. Press enter.
  9. After a few seconds, a new screen will appear, again with a pull-down box. This box is for selecting drivers. The CUPS-PDF driver does not really need this, so open the box labeled "Make:" and select "Generic" and press enter.
  10. Move to the "Contiune" link and press enter.
  11. The next screen will appear and we can skip over the fields (they should already be correct.) Move the cursor to the link labeled "Add Printer" and press enter.
  12. You will briefly see a screen announcing that the printer has been successfully added. It will be followed by a page of printer options. If you need to change any, such as default paper size, do so now. When done, move to the link labeled "Set Printer Options" and press enter.
  13. The final screen contains a summary of the printer setup and contains a list of links for controlling the printer including printing a test page.

At this point we are done. You may move to the "Home" link at the top of the page to repeat the process to add more printers.

That's all for this installment. Next time we will look at some printer commands that we can use with our new printing capability.

Further Reading

Other installments in this series: 1 2 3 4 5 6 7 8 9 10 11 12 13 14

Monday, March 23, 2009

Saturday, March 21, 2009

Project: Building An All-Text Linux Workstation - Part 5

In today's episode, we'll look at sudo and some text editing stuff. So fire up your text boxes and let's get going!

sudo
If you're an Ubuntu user, you probably already know a little about sudo. It's the command you use to get temporary administrative privileges for doing such things as editing configuration files and installing software. sudo allows users to enter their own password instead of the root password to perform privileged tasks. Further, sudo can be configured to allow specific users specific privileges. For example, a user can be allowed to only execute a specific command as the superuser.

sudo is invoked this way:

sudo command

where command is the command to be executed with escalated privileges.

One of the inconveniences on our all-text system is that we must either login as root or use the su command to shut the system down, since only the superuser is allowed to shutdown the system. A sensible precaution considering that Linux systems are designed to support multiple users at the same time.

To fix this problem, we'll install sudo on our system. We can do this with either aptitude or apt-get. As root, enter the following command:

apt-get install sudo

and the sudo package will be installed.

sudo is controlled by a configuration file named /etc/sudoers. The sudoers file is a little unique in that it wants to be edited only with the visudo program. You can actually edit it with any text editor, but the visudo program checks the syntax of the file to help prevent errors. This is important for any file with the security implications of sudoers.

To edit the file, we simply (as root again) enter the command:

visudo

and the following screen will appear:


Despite the name, the visudo program uses the nano text editor and not vi. This makes it much easier for new users. Our change to the sudoers file is very simple. Add this line in the section labled "User privilege specification" and then save the file and exit the editor by first typing ctrl-o and then ctrl-x.:

me ALL=(ALL) ALL

Substitute your user name for the name "me" and this configuration will allow you to execute any command with root privileges by entering your own password.

To allow a user of the system to only run the poweroff command (performs the same as shutdown but does not require the time to be specified), we could add this line to the file:

username ALL=(ALL) /sbin/poweroff

where username is the name of the user.

nano
As we have seen, our Debian system has the nano text editor installed by default. nano is a clone of an earlier editor named pico that is included with the pine email program. pine has some license issues that prevents it from being included with some Linux distributions so a replacement version of its editor was developed.

To use nano, type the following:

nano textfile

where textfile is the name of a file to edit.

As text-based editors go, it's pretty easy to use. It provides a small list of commands at the bottom of the screen. Pressing the ctrl-g key brings up the help screen which displays all of its commands. nano does support the mouse. See the nano man page for details.

nano uses a global configuration file named /etc/nanorc and, if available, a local configuration file named ~/.nanorc. To make an initial copy of the local configuration file, copy the global file to your home directory:

me@linuxbox:~$ cp /etc/nanorc ~/.nanorc

One useful change we can make to the configuration file is the activation of syntax highlighting. This can be done by removing comments from several lines at the end of the file. The last section of the configuration file, the "Color setup" section, has a number of "include" statements which load syntax definitions. To enable syntax highlighting support, remove the comment symbol from the beginning of the line. Change lines like this:

## Bourne shell scripts
#include "/usr/share/nano/sh.nanorc"


to:

## Bourne shell scripts
include "/usr/share/nano/sh.nanorc"


for as many languages as you wish to support.

Syntax highlighting is automatically activated based on the file name extension of the file being edited. For example, if we edit a file named foo.html and the HTML syntax definition has been included in the .nanorc file, the foo.html file will be displayed with syntax highlighting when loaded. The colors can be toggled on and off by pressing alt-y. This presents a problem for shell scripts, however as most do not have a file extension in their name. This can be solved in one of two ways. First, add the extension ".sh" to the file name, or second, invoke nano with the -Y sh option, which forces the selection of the sh highlighting. It might be a good idea to add an alias such as:

alias nano-sh='nano -Y sh'

to your .bashrc file to make this more convenient.

vim
Real Linux users, of course, don't use nano. They use vim, the enhanced replacement for the traditional Unix editor, vi. The version of vim installed by default on our system is called vim-tiny, a subset of the full package. I recommend installing the full vim package. This can be done with apt-get like so:

apt-get install vim

I'm not going to cover vim in this posting as it would take too much space (it consumed a rather chapter in my upcoming book) but there is a pretty good on-line book (in PDF format) that describes it in detail. See The Vim Book. Seriously, to be a real Linux person you should take the time to learn it. I know its not easy, but you'll really enjoy lording it over the other Linux newbies once you do.

Well, that's all for this time. See you again soon!

Further Reading

Other installments in this series: 1 2 3 4 5 6 7 8 9 10 11 12 13 14
Wednesday, March 11, 2009

Project: Building An All-Text Linux Workstation - Part 4

In this installment, we will explore web browsing and install a couple of packages to help with file management.

A Text Web Browser?

Yes, there are such things. In fact there are several available for Linux. Our Debian workstation has one installed by default. Called w3m, it is a full featured browser that operates in text mode. So what can you do with it? Well, we won't be watching YouTube with it, that's for sure, but many well written web sites (especially those designed to follow acceptable standards of accessibility) will render just fine. We can try it out:

me@linuxbox:~$ w3m linuxcommand.org

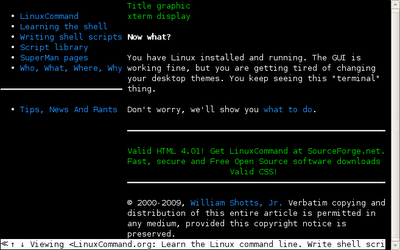
and after a few seconds we will see this:

The arrow keys will navigate, and the tab key will advance from link to link. Shift-h will bring up the help screens and shift-b will perform a "back" function (this will get you out of help too). Press the q key to quit w3m. The program can do tabbed browsing, render tables and has a number of command line tricks. This blog renders fine too, so you can now follow along directly on our all-text system.

Unfortunately, there is a bug that prevents w3m from using the mouse on the console to help with navigation. Fortunately, there are other browsers that you can install. See the link at the end of this article.

Automatically Mounting USB Devices

If we insert a USB flash drive into our system, we will see a kernel message appear on the screen. This is because the kernel sends its messages to the console in the hopes that an ever-vigilant operator (that's you) is paying attention. However this message means very little as it only announces the fact that the kernel has detected a device attached to the USP port. It does not mean that the system has done anything useful, like mounting the device. We could manually mount the device, that that is a nuisance.

To solve this problem we will install a package called usbmount that can automatically mount USB devices. We can do this using aptitude. Just search for the "usbmount" package and install it. We described the process in installment 3.

After the package is installed, we must modify its configuration file to allow support for VFAT file systems, the type most often used on USB drives. As a precaution, usbmount does not enable VFAT since the kernel does not fully support the "sync" mount option on VFAT file systems. Normally, usbmount allows USB devices to removed without unmounting. It does this by keeping file systems "synchronized," that is, it immediately writes changes to the device versus waiting to consolidate multiple write for improved performance. With VFAT enabled, the user must issue a sync command before removing a USB VFAT device.

After the package is installed, we need to (as root) edit the /etc/usbmount/usbmount.conf file and change the following two lines:

FILESYSTEMS="ext2 ext3"

to:

FILESYSTEMS="ext2 ext3 vfat"

and:

FS_MOUNTOPTIONS=""

to:

FS_MOUNTOPTIONS="-fstype=vfat,gid=floppy,dmask=0007,fmask=0117"

After the configuration file is modified, usbmount will automatically mount VFAT devices. You will find the mount point in the /media directory. When a flash drive is inserted we can verify the mount using df:

me@linuxbox:~$ df
Filesystem           1K-blocks      Used Available Use% Mounted on
/dev/hda1             18856292    980140  16918280   6% /
tmpfs                   160096         0    160096   0% /lib/init/rw
udev                     10240        88     10152   1% /dev
tmpfs                   160096         0    160096   0% /dev/shm
/dev/sda1                15560      5944      9616  39% /media/usb0
and we see that the drive has been mounted on /media/usb0. Just remember to use the sync command before removing the device, or really bad things may happen to the drive:

me@linuxbox:~$ sync

Midnight Commander

The last package we will install in this episode is Midnight Commander, a text based file manager. Using aptitude, install the mc package and the following additional packages that are recommended: arj, bzip2, odt2txt, unzip, and zip. If you prefer, you can use apt-get to install the packages as the mc package is a little hard to find using aptitude:

linuxbox:~# apt-get install mc arj bzip2 odt2txt unzip zip

After mc is installed we can fire it up:

me@linuxbox:~$ mc

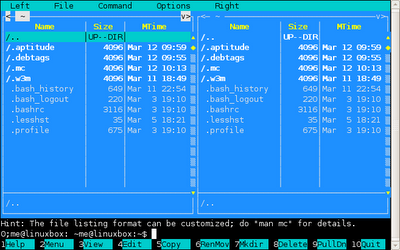
and the following screen will appear:


The numbered blocks along the bottom of the screen correspond to the function keys, F1-F10 and permit access to many of the programs functions and it has a lot of them! Unlike w3m, the mouse is well supported by mc.

That's all for this installment. While you're waiting for Part 5, study Midnight Commander. It has a help function and a man page. That should keep you busy for a while! Also, if you are interested in other text-based web browsers, check out the Text Mode Browser Roundup from Linux Journal.

Further Reading

Other installments in this series: 1 2 3 4 5 6 7 8 9 10 11 12 13 14
Monday, March 9, 2009

Dvorak Likes Linux

I never thought that I would live long enough to see it, but John C. Dvorak, professional curmudgeon likes Ubuntu!

Thursday, March 5, 2009

Interview With Steve Bourne, Creator Of sh

Computerworld has a very interesting interview with Steve Bourne, the author of sh (the ancestor of bash) where he talks about the history of the Unix shell. A good read for you Unix history buffs out there.

Wednesday, March 4, 2009

Project: Building An All-Text Linux Workstation - Part 3

In this installment we'll learn how to navigate the text environment and install our first packages.

If you have gotten through parts 1 and 2 of our series, you now have a sparkling new Linux system that displays -- a prompt! But if you think it only displays one prompt, you'd be wrong, as we shall soon see.

Let's fire up our system and log in again as the root user.

One of the commands I often use is locate, which rapidly searches a small database of files installed on the system. locate is installed on our system but when we try to use it we get the following message:

linuxbox:~# locate foo
locate: can not open `/var/lib/mlocate/mlocate.db': No such file or directory

This message appears when you try to use the locate command before the database is created. Normally the database is rebuilt each night by a cron job, but unless you let the machine run overnight, the database will never get built. We'll fix this problem in a little bit, but to solve the problem in the meantime, we'll run the database update program manually:

linuxbox:~# updatedb

After it completes, locate should start to work. If you are unfamiliar with this wonderful utility, now is a good time to look at its man page.

If we enter the command:

linuxbox:~# locate foo

We will get back a long list of filenames containing the string "foo." Go ahead and do this. Notice how the list scrolls off the top of the screen. Next, type shift-PageUp and notice how we are able to scroll up the list. Shift-PageDown scrolls downward.

The terminal screen is only 80 characters wide but sometimes a command will output lines wider than 80 characters. This will usually cause the text to wrap but in some rare instances it will actually go off the edge of the screen. In these cases, you can scroll the screen sideways by using the shift-right arrow and shift-left arrow.

To see the next keyboard trick, type Alt-F2 and you will see a new login prompt. Actually you are seeing another virtual terminal you can log into. Go ahead and log in using your ordinary user name and password. Now try the who command:

me@linuxbox ~$ who
root tty1         2009-03-04 13:49
me   tty2         2009-03-04 14:28


As we can see, we have two users logged in. Type Alt-F3 and we'll see another virtual terminal. In fact, on our system, Alt-F1 through F6 provide separate terminals we can use. You can use Alt-right and left arrows to rapidly cycle through them.

Wouldn't It Be Great If The Mouse Worked?

Let's go back to the first terminal session where root is logged in by typing Alt-F1. Then start up the aptitude program:

linuxbox:~# aptitude

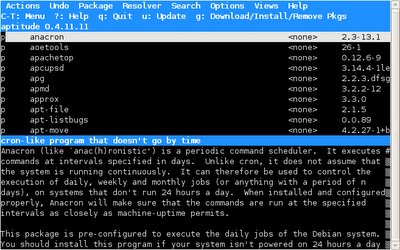
aptitude is a fancy character based way to install packages on Debian and other Debian-based distributions. It has many features and is a handy way to manage packages on our system. The apt-get program is also available. aptitude features a multi-pane screen:


It took me a few minutes to figure out the user interface, but after installing a few packages with it, I figured it out. We're going to use aptitude to install a couple of packages. We'll use its search feature to help us out. Type / and a search prompt should appear. Enter "anacron" and it should find the package in its database.


You can use the tab key to toggle between the two display panes. With the package name highlighted, press the + key to mark the package for installation. Next, let's do another search, this time for "gpm". If it does not find it the first time, type "n" to search for the next occurrence. Repeat until it finds a package named simply gpm. This use of / (search) and n (next) is the same as the less program. Again, type + to mark the package for installation.

With our two packages selected, it's time to install them. We do this by typing "g" (for "go".) aptitude will display a summary of the actions it is about to take and by pressing "g" a second time, the installation will commence. When installing gpm for the first you will see an error message about being unable to shut down the daemon. This may be safely ignored.

When the aptitude screen returns, type "q" to quit.

We have now installed anacron, which will make sure that periodic tasks (like running updatedb) take place even if the machine is not run continuously. We also installed gpm which should make the mouse work. Some of the programs that we will install in upcoming installments can use a mouse, but its most useful feature is that we can now use the mouse to copy and paste text, just like we can on the X display. The only difference is that the right button is used to paste rather than the middle button.

You can terminate your extra terminal sessions by typing "exit" and root can shut down the machine by:

linuxbox:~# shutdown -h now

That's all for today. See you again soon!

Further Reading

Other installments in this series: 1 2 3 4 5 6 7 8 9 10 11 12 13 14

Monday, March 2, 2009

Linuxcommand.org Terminal Screenshot Colour Scheme

I recently received this email from inquisitive reader Dermot:
Hi

I was going through your website http://linuxcommand.org tonight and find it really easy to follow how the commands and descriptions are laid out. I have a question about the screenshots you use.

The terminal screenshots have a black background, with "[me@llinuxbox me}$" in green and the commands to be run in white. How did you get this colour scheme? Ive been asking on Ubuntuforums and other forums, as it would really make the lines on which you enter commands stand out against the output results of those commands.

Please get back to me if you get a chance.

Thanks

Dermot
Ireland

Thanks Dermot for taking the time to write. The "screen shots" you refer to aren't actually screen shots at all. They're implemented in hand-coded HTML and CSS, but you can create the same effect on your own system. Here's how:

The contents of your prompt are defined in an shell variable called PS1. You can examine its contents like this:

me@linuxbox ~$ echo $PS1
${debian_chroot:+($debian_chroot)}\u@\h:\w\$

This example is from an Ubuntu system. Other distributions will be different.

To set the colors, first use the Edit -> Current Profile dialog in gnome-terminal to set the color scheme to "White on black":

Next, you need to add some ANSI color codes to the prompt string contained in PS1. To change the prompt to green and then back to its original colors (so that subsequent text will remain white), you need to change the prompt string to this:

\033[0;32m${debian_chroot:+($debian_chroot)}\u@\h:\w\$\[\033[0m\]

You can test your prompt by setting the PS1 variable this way:

me@linuxbox ~$ PS1="\033[0;32m${debian_chroot:+($debian_chroot)}\u@\h:\w\$\[\033[0m\] "

After you are satisfied with the new prompt design, you can make it permanent by adding these two lines to your .bashrc file:

PS1="\033[0;32m${debian_chroot:+($debian_chroot)}\u@\h:\w\$\[\033[0m\] "
export PS1

Hope this helps!

You can read more about configuring the prompt at the Linux Documentation Project. They have an excellent HOWTO document entitled:

The Bash-Prompt HOWTO