Wednesday, February 24, 2010

Project: Building An All-Text Linux Workstation - Part 11

Now that we have email working on our system, it's time to consider other types of communication tools, in particular, messaging.  Text messaging is a very common form of communication today, often surpassing email as way of sending short bursts of small messages.  Messaging actually has its roots in early Unix with the development of the write and talk programs in the late 1970s   While both talk and write were used to communicate with multiple users sharing a single machine, messaging today generally involves users scattered all over the globe using the Internet.

There are many popular messaging protocols such as AIM (AOL Instant Messenger), Jabber, MSN, IRC, and others and many client programs that support one or more of these protocols.  Many Linux users are familiar with Pidgin, a graphical, multi-protocol, messaging client.

In this installment, we will install a text-based analog to Pidgin called centerim, a fork of an earlier messaging client program called centericq.

On our Debian workstation, we can easily install centerim this way:

me@linuxbox:~$ sudo apt-get install centerim

After the program is installed, we can invoke it like so:

me@linuxbox:~$ centerim

The first time centerim runs, it displays a two-part configuration screen which is used to configure accounts and other stuff:
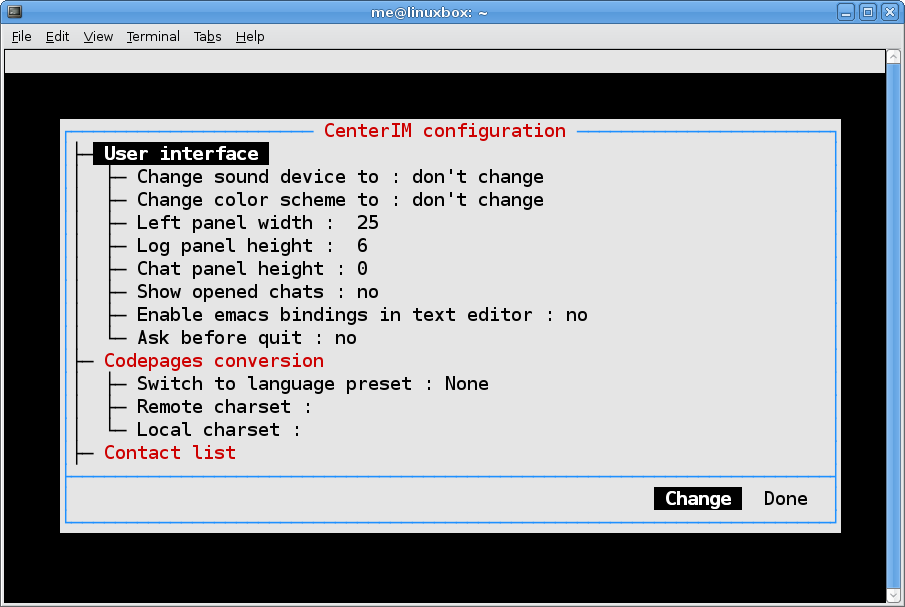


To demonstrate centerim in action, we'll configure an AIM account.  On the second configuration screen, we'll scroll down until we get to the AIM protocol:
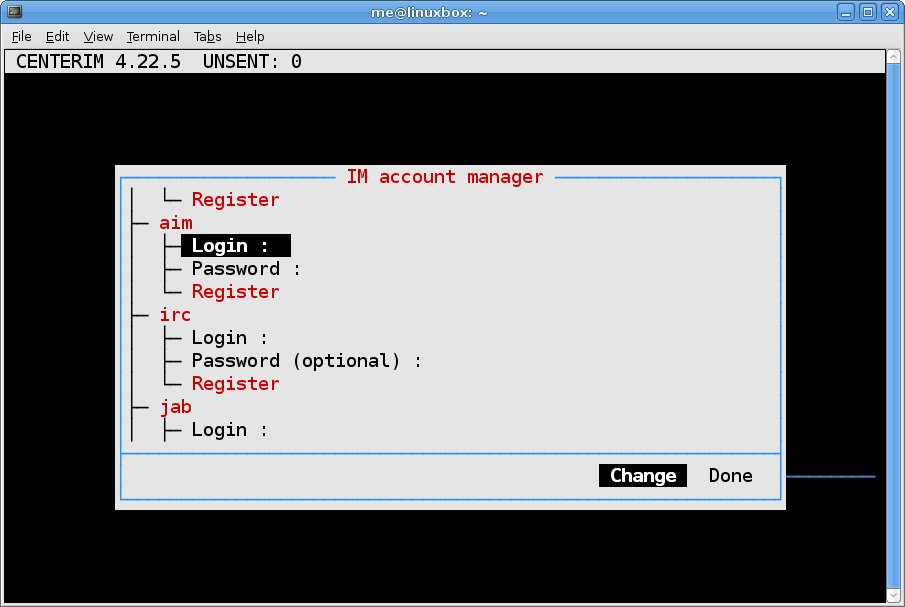


Next, we'll enter our account information including our AIM screen name and password:


After we have the account defined, we use the right arrow key to select "Done."  Next, centerim displays our chat window:


Pressing the Esc key twice will take you to the top level menu and from there you can go back to the configuration screens (F4) or quit the program (q).

Further Reading

Centerim and centericq:
Historical background on text messaging:
Other installments in this series: 1 2 3 4 5 6 7 8 9 10 11 12 13 14

Friday, February 19, 2010

Launching Shell Scripts In GNOME

Today, we're going to look at how you launch a shell script (or other terminal-based application) in GNOME.  We are all familiar with launching applications from the command line.  There are advantages to this even for graphical applications.  When you launch an application on the command line, you can see what is produced on standard output and standard error, which can sometimes provide valuable diagnostic information.  On the other hand, there is something to be said for double-click convenience as well.

We will write a tiny shell script and then set up GNOME to allow launching the script from a desktop icon.  Here's the script we will use:

#!/bin/bash

# touch_foo - Script to touch the file "foo"

if [ ! -d foo ]; then
    touch foo
    echo "foo is touched."
else
    echo "foo is a directory."
fi

Pretty simple.  This script touches a file name "foo" but if a directory with that name already exists, it displays a message and exits.  We will enter this script into our text editor and save it as ~/bin/touch_foo.

Next we need to create a launcher for the script.  To do this, we right click on the GNOME desktop and select "Create Launcher...":


A dialog box will appear where we can enter information about the launcher:


Since we want to see the script execute, we will select "Application in Terminal," otherwise the script will execute silently in the background:


Next, we give the launcher a name, browse for the script file, and fill in an optional comment:


You may also click on the icon at the right of the dialog box and select another icon for the launcher.  After the dialog box is filled out, we can click the OK button and the launcher is created and it will appear on the desktop.  Double clicking on the new launcher icon launches the script.

But there's a problem.  The terminal appears for an instant and vanishes.  Not exactly what we had in mind.  What gives?

The problem is that when the script finishes, the terminal session ends.  To prevent this, we have to stop the script from finishing.  We could do this by having an endless loop at the end of the script, or by including a read command which will wait for user input before proceeding.  We can adjust our script by adding a line at the end:

#!/bin/bash

# touch_foo - Script to touch the file "foo"

if [ ! -d foo ]; then
    touch foo
    echo "foo is touched."
else
    echo "foo is a directory."
fi

read -p "Press Enter to continue > "

After making this change, a terminal will appear and wait until the Enter key is pressed:


Another Approach

Another way we can configure commands for the launcher is to directly launch gnome-terminal and pass the desired command as an argument.  This allows us to control the configuration of the terminal.  For example we can set the window title, window geometry, and terminal profile used with our command.  Here is a command we can use to launch the top program and set the window title to "Top":

gnome-terminal -e /usr/bin/top -t Top

Note however, that if you want to run shell scripts this way, you must construct the command this way:

gnome-terminal -e 'bash -c touch_foo'

including the bash program in the command so that there is a program present that can interpret your script.

Further Reading
  • gnome-terminal man page
  • bash man page (OPTIONS section)

Wednesday, February 17, 2010

tput

In a recent post, we covered a technique that can produce colored text on the command line.  Today, we will look at a more general approach to producing not only text effects, but also gaining more visual control of our terminal.

A Little History

Back in the old days, when computers were connected to remote terminals, many brands of terminals existed and they were all a little different in terms of their feature sets and capabilities.  As a result, different terminals used different sets of commands to control them.

Terminals responds to codes (called control codes) embedded in the stream of text sent to them.  Some of these codes are standard and familiar like carriage return and line feed.  Others, like those to turn on bold text or underlining are not.  Terminals can, in fact, perform many kinds of functions.  As microprocessors became available and the advent of the personal computer loomed, terminals became increasingly "smart" and feature laden.

However the proliferation of terminal brands and feature sets posed a problem for software developers.  Software had to be painstakingly customized to support a particular terminal.  What was needed was a software system that supported hardware independence so that applications could use a standard set of commands to deal with any terminal.  This problem was addressed in two ways.  First a standard set of control sequences were developed by ANSI (American National Standards Institute) and adopted (in varying degrees) by terminal manufactures to give all terminals a common set of commands.  We looked at the ANSI commands in a an earlier post.  The second approach was development of an intermediary layer (much like today's notion of a device driver) that translates a standardized command into the specific control codes used by a particular terminal.

In the Unix world, there are two such systems, the original, termcap and the more recent terminfo. Both contain a database of control code sequences used by different kinds of terminals.

Enter tput

tput is a command that can query the terminfo database to see if a particular terminal can support a particular feature.  It can also accept terminal commands and output (via standard output) the control code sequences for that terminal.  tput is generally used like this:

tput capname [parameters...]

where capname is the name of a terminal capability and parameters are any option parameters associated with the specified capability.  For example, to output the sequence of instructions needed to move the cursor to the upper left corner of the screen (the "home" position):

tput cup 0 0

which means cursor position row 0, column 0.

Since tput actually outputs the sequence to standard output (you won't see the sequence since it is interpreted by your terminal emulator as an instruction), you can store the sequences in variables.  Here we will store the sequences to control bold text:

bold_on=$(tput bold)
bold_off=$(tput sgr0)

Now, to highlight some text, you could:

echo "This is ${bold_on}important${bold_off}."

and you get this:

This is important.

There are a huge number of terminal capabilities, though most terminals only support a small subset.  Besides changing text colors and positioning the cursor, it is possible to erase text, insert text, and control text attributes.  The terminfo man page lists all the terminal capabilities and the Bash Prompt HOWTO section 6.5 (see "Further Reading" below) describes the ones most useful for ordinary screen control.

Before we leave, here is a version of the prompt_colors script that uses tput to set foreground and background text colors:

#!/bin/bash

# prompt_colors -- demonstrate prompt color combinations.

for fore in {0..7}; do
    set_foreground=$(tput setf $fore)
    for back in {0..7}; do
        set_background=$(tput setb $back)
        echo -n $set_background$set_foreground
        printf ' F:%s B:%s ' $fore $back
    done
    echo $(tput sgr0)
done

Further Reading

Saturday, February 13, 2010

Prompt Tricks 2

I'm a little behind because of all the snow, but fortunately ace book reviewer Mark Polesky has come to my rescue with some feedback on my previous post.  He writes:

That's a pretty cool script, but the formatting of the
output is a little sloppy.  If nothing else this line is in
the wrong place:

  printf '\033[0m'

Here's a much cleaner version using bash.

- Mark

* * * * * * * * * *

#!/bin/bash

# prompt-colors -- demonstrate prompt color combinations.

for attr in 0 1 4 5 7; do
  echo
  printf "ESC[%s;Foreground;Background\n" $attr
  for fore in {30..37}; do
    for back in {40..47}; do
      printf '\033[%s;%s;%sm %02s;%02s ' \
        $attr $fore $back $fore $back
    done
    printf '\033[0m\n'
  done
  echo
done

Good job, Mark (he has become a real command line ninja since he read my book from cover to cover as a reviewer).

One of the interesting things Mark did in converting the script from plain sh to bash was to employ brace expansion in the for commands.  For example:

for fore in {30..37}; do

This expansion results in a sequence of numbers from 30 to 37 inclusive, a good technique to know.

But what if you need to produce a sequence of numbers that increment by a value other than one?  Let's say that you only wanted odd numbers from 1 to 7?  In this case, you could code the sequence literally:

for i in 1 3 5 7; do

That's easy, but what about a sequence from 1 to 777?  Not so easy.

To produce a large sequence, you can use the seq command.  It works like this:

seq [-options] [first [increment]] last

where first is the first number in the desired sequence, increment is the size of the step between each member of the sequence and last is the last number in the sequence.  For example, to produce a sequence of odd numbers from 1 to 777, we would do this:

for i in $(seq 1 2 777); do

The seq command is also handy if you need to ensure that a script can run under sh since sh lacks the brace expansion feature of bash.

Well, that's all I have.  Got to get back to shoveling!

Further Reading

Wednesday, February 10, 2010

Prompt Tricks

Kind book reader Bruce Fowler sent me a note shortly after the book was released providing some feedback on Chapter 14, "Customizing The Prompt."  He pointed out (quite rightly) that there are many practical things you can do with the shell prompt that can make your command line experience easier and more enjoyable.  One of his favorites was simply coloring the shell prompt so that it is easier to see in a long stream of text output.


Your shell prompt is defined by the contents of a shell variable named PS1.  The variable contains a combination of literal text and special codes that expand into various elements of the prompt when it is displayed.  We can easily modify our prompt to give it the color green.

First, we'll save a copy of our current prompt string in a new variable named PS1_OLD:

me@linuxbox:~$ PS1_OLD="$PS1"

Later, if you want to revert to the original prompt settings, you can do this:

me@linuxbox:~$ PS1="$PS1_OLD"

Next, we'll add ANSI escape sequences to the beginning and end of our prompt string to set the color to green and back to its original color:

me@linuxbox:~$  PS1="\[\033[01;32m\]$PS1\[\033[00m\]"

Now, we have a green prompt!

me@linuxbox:~$

Let's break this prompt string down:

Element Meaning
\[ Beginning of non-printing sequence. You need to tell bash that the sequence that follows does not actually print characters on the screen (it only sends control instructions to your terminal emulator setting the color). bash would otherwise count the characters and this would mess up bash's calculation of the cursor position which it does to support command line editing.
\033[01;32m ANSI sequence to set foreground text green.
\] End of non-printing sequence.
$PS1 Original prompt string. We're embedding the original prompt string in the middle to retain its design.
\[ Beginning of non-printing sequence. Again, the sequence that follows to reset the colors does not print characters on the screen.
\033[00m Sequence to reset attributes and color to previous settings.
\] End of non-printing sequence.

To make this change permanent, add this line to your .bashrc file:

PS1="\[\033[01;32m\]$PS1\[\033[00m\]"

Bruce also suggested making the prompt for the root account (if your system is so equipped) a different color (like red) to remind you that you are operating as the superuser.

Finally, Bruce included a short script that he picked up from a USENET group which displays all the possible color and attributes supported by ANSI:

#!/bin/sh
############################################################
# Nico Golde (nico(at)ngolde.de) Homepage: http://www.ngolde.de
# Last change: Mon Feb 16 16:24:41 CET 2004
############################################################

for attr in 0 1 4 5 7 ; do
    echo "----------------------------------------------------------------"
    printf "ESC[%s;Foreground;Background - \n" $attr
    for fore in 30 31 32 33 34 35 36 37; do
        for back in 40 41 42 43 44 45 46 47; do
            printf '\033[%s;%s;%sm %02s;%02s  ' $attr $fore $back $fore $back
        done
        printf '\n'
    done
    printf '\033[0m'
done

When executed, the results look like this:


Further Reading

Friday, February 5, 2010

Project: Building An All-Text Linux Workstation - Part 10

In this installment, we'll finish up our look at email.

Now that we have mutt talking to the outside world, it would be handy if we could also send messages from the command line as we did in Part 8 using the mail command. Fortunately, mutt supports the same technique.

Using mutt On The Command Line

We can send the output of a command to a remote email recipient via our POP3 configuration using a command such as this:

me@linuxbox:~$ ls -l | mutt-p -s "test message" someone@somewhere.com

Here we used the alias "mutt-p" described in the previous installment. Please note that if such an alias were used in a shell script, it would most likely fail because the .bashrc file where the alias is defined is not sourced by the copy of the shell executing the script. In such a case, we would need to spell the command out fully:

mutt -F ~/.muttrc-pop3 -s "test message" someone@somewhere.com

Another Mail Client

While Debian installs mutt by default, it's not the only full-featured text-based email client available. Another popular choice is Alpine, the successor to the popular PINE email client from the University of Washington. Alpine is similar to mutt in most respects though I think it has an easier user interface:


In addition to the usual email functions, Alpine also sports its own address book and Alpine's configuration is adjustable from within the user interface so that editing the configuration files is not strictly necessary, but its configuration is as complicated as mutt's.


Alpine configuration, top-level


Alpine configuration, down deep

Summing Up

Text-based email clients have a long and storied history in the Unix world and remain the tools of choice for serious email users. As you dig deeper into the documentation of mutt and Alpine, you will find that nothing compares to the configurability of either of these programs.

Further Reading

More support resources for mutt:
For Alpine:
Other installments in this series: 1 2 3 4 5 6 7 8 9 10 11 12 13 14

Wednesday, February 3, 2010

Project: Building An All-Text Linux Workstation - Part 9

In our previous installment we saw how our Debian workstation supports email between users on the system.  This time we're going to add the ability to send and receive email over the Internet.

One of the reasons that email is such a difficult subject to cover is that there are so many different kinds of email tools and configurations.  For this lesson, we are going to create a really simple configuration designed to satisfy the basic needs of a residential user.  It is certainly possible to create a much more sophisticated configuration.  In fact, with Linux, almost any kind of email setup is possible, including huge enterprise-class solutions.

As we saw last time, our email client, mutt, reads mail messages that it finds in a mailbox file located in /var/mail.  To send mail, mutt passes a composed message to the exim mail transport agent (MTA) for delivery.  So how do we send mail to the outside world?

The Traditional Way

The traditional way is to configure the MTA to communicate with a smarthost, a remote server that can determine where the remote recipient's mailbox is located and pass the messages to it.  Such a configuration can be easily created in Debian by telling the package installer to reconfigure the exim4 package using a script built into the package.  This technique is good if your workstation is on a corporate network and you have a mail server through which mail from all users is sent and received.  You can find a complete description of this configuration process here.

Receiving mail is traditionally done by either configuring the MTA to receive incoming connections from other mail servers, or by running a mail delivery agent program (such as fetchhmail or getmail) that copies the contents of remote mailboxes to the local mailbox.

However, the traditional approach is not well suited to our residential workstation because each user may have different email providers, so we need a solution that is potentially different for each user.  Of course, with enough configuration, the traditional approach can be made to work, but it wouldn't be pretty.

The Client Centric Way

For those of you who have used GUI-based email clients like Evolution or Thunderbird, the traditional way probably seems very alien and complex.  You have likely used a single email client program that performs all the functions of the multi-program traditional method.  That's the approach that we'll try to take.  Too bad mutt makes it so hard.

The designers of mutt have taken the fairly stern view that a mail user agent (MUA) should be a mail user agent and nothing more.  In recent years however, they have softened their stance on this issue somewhat and now offer optional support for SMTP (Simple Mail Transport Protocol) to communicate with smarthosts and POP and IMAP support for reading mail on remote servers.  Fortunately, the version of mutt supplied with Debian has these optional features compiled in.

In the exercise that follows, we are going to configure mutt to use a POP3 server and an external smarthost, and an IMAP server and an external smarthost.  By leaving the configuration of exim unchanged, we will continue to send and receive local mail.  Note that you will need to adjust the configuration files listed below to fit your ISP's specific requirements.

POP3 Configuration

The Post Office Protocol (POP) is an older and less sophisticated mail delivery system.  It is common among residential ISPs.  To configure mutt to download messages from a remote POP3 (POP version 3, the version most often used today) and to send messages via a remote SMTP server acting as the smarthost, we will create a mutt configuration file and name it ~/.muttrc-pop3:


### POP3 setup for incoming mail

# File where incoming messages will be kept
set spoolfile=~/mailbox-pop3

# Your user name as understood by your ISP
set pop_user = "username"

# Your password as understood by your ISP
set pop_pass = "password"

# Host name of ISP's POP3 server
set pop_host = "mail.your_isp.com"

# Do not delete messages from POP3 server after downloading.
# Change to "yes" after testing.
set pop_delete = no


### SMTP setup for outgoing mail

# URL of ISP's SMTP server
set smtp_url = "smtp://username@mail.your_isp.com/"

# Password for SMTP server
set smtp_pass = "password"

# Your email address as understood by your ISP
set from = "username@your_isp.com"

# How you want your name to appear in email messages
set realname = "Your Name"

To execute this configuration, we invoke mutt this way:

me@linuxbox:~$ mutt -F ~/.muttrc-pop3

IMAP Configuration

If you have a good ISP, they will offer Internet Message Access Protocol (IMAP) on their mail server.  IMAP keeps your mail on the server and allows you to maintain multiple folders and has a host of other features lacking in the POP system.  In the configuration below, we will communicate with a remote IMAP server using SSL for encryption.  We will call this configuration file ~/.muttrc-imap.

Note: In order to use SSL authentication, make sure you have the libsasl2-modules package installed on your system.


### IMAP setup for incoming mail

# Your email address as understood by your ISP
set imap_user = "username@your_isp.com"

# Your account password
set imap_pass = "password"

# Name of your ISP's IMAP server and folder locations
set folder = "imaps://mail.your_isp.com:993"
set spoolfile = "+INBOX"
set postponed="+/Drafts"

### SMTP setup for outgoing mail (using SSL)

# URL of ISP's SMTP server including SSL (smtps://) and port
# number (:465) as needed.
set smtp_url = "smtps://username@mail.your_isp.com:465/"

# Password for SMTP server
set smtp_pass = "password"

# Your email address as understood by your ISP
set from = "username@your_isp.com"

# How you want your name to appear in email messages
set realname = "Your Name"

### Files needed to store IMAP cache and SSL certificates

set header_cache=~/.mutt/cache/headers
set message_cachedir=~/.mutt/cache/bodies
set certificate_file=~/.mutt/certificates


To use this configuration, we need to create the directories for the IMAP cache and for SSL certificate storage.  We can create them with the following command:

me@linuxbox:~$ mkdir -p ~/.mutt/cache/bodies

To execute this configuration, we invoke mutt like this:

me@linuxbox:~$ mutt -F ~/.muttrc-imap


Using Aliases To Support Multiple Configurations

We can simplify the invocation of mutt by adding these two lines to our ~/.bashrc file:

alias mutt-p='mutt -F ~/.muttrc-pop3'
alias mutt-i='mutt -F ~/.muttrc-imap'


There you have it.  We now have mutt commands for handling local mail (mutt), POP3 mail (mutt-p) and IMAP mail (mutt-i).

Further Reading

Background on mail protocols:
Using mutt with Gmail via IMAP:
Mutt configuration samples:
Other installments in this series: 1 2 3 4 5 6 7 8 9 10 11 12 13 14